
 By Elson Correia
With new releases and tools, setting up a node server has become super simple, and until NodeJs ships with typescript built-in, adding typescript will be an essential need.
I will show you the SIMPLEST setup you can have to kick off your next node project confidently. For simplicity, you can customize it with the things you need to complete your project.
Setup for a TypeScript Node NPM Package Project medium.com
Project Directory Setup
Let’s start by setting up your project directory
mkdir YOUR_PROJECT_NAME
cd YOUR_PROJECT_NAME

git init # start your git project

npm init -y # initialize npm with defaults

mkdir src # create the source directory for all the code
One thing we need to do is ensure our project is of type module in the package.json .
{
  "name": "YOUR_PROJECT_NAME",
  "version": "1.0.0",
  "description": "",
  "type": "module",
  "scripts": {},
  "keywords": [],
  "author": "",
  "license": "MIT"
}
I recommend going for module and ESM in general and leaving behind the commonjs setup.
Setting up Typescript
Let’s start with a couple of installs…
npm install -D typescript @types/node
The @types/node pretty much sets up types for the entire node itself.
We can now create the ts-config.json file by running:
npx tsc --init
This will add a ts-config.json file to the root of the project with all defaults, including commented-out ones. We need to have the following configurations
{
  "compilerOptions": {
     "target": "ESNext",
     "module": "ESNext",
     "rootDir": "./",
     "moduleResolution": "node",
     "resolveJsonModule": true, /* in case you are importing JSON files */
     "outDir": "./build",
     "esModuleInterop": true,
     "forceConsistentCasingInFileNames": true,
     "strict": true,
     "noImplicitAny": true,
     "skipLibCheck": true,
     "sourceMap": true
  }
}
Feel free to uncomment a few other options to fit your project. This should be good to start.
Create a simple server
To test if everything is working fine, let's add a simple server code.
Create a file src/index.ts and add the following code:
// src/index.ts

import http from "http";

export const server = http.createServer((req, res) => {
  res.writeHead(200, { "Content-Type": "application/json" });
  res.end(
    JSON.stringify({
      data: "It Works!",
    })
  );
});

server.listen(3000, () => {
  console.log("Server running on http://localhost:3000/");
});
This is a simple HTTP Node server listening on port 3000. It should be enough to test our setup.
Now let’s try to build this by adding a build script to our package.json file.
"scripts": {
  "build": "tsc"
}
Now if you run npm run build you should see a build directory added to the project root folder with a src directory and the package.json file. The server code should look something like so:
import http from "http";
const PORT = process.env.PORT || 3000;
export const server = http.createServer((req, res) => {
    res.writeHead(200, { "Content-Type": "application/json" });
    res.end(JSON.stringify({
        data: "It Works!",
    }));
});
server.listen(PORT, () => {
    console.log(`Server running on http://localhost:${PORT}/`);
});
//# sourceMappingURL=index.js.map
This confirms our build works and as you can see, the compiled code is not too different from the code we wrote. This is because we are targeting ESNext in the ts-config.json so we have the most modern code.
Set up how to run the server
We have to think about it in terms of the final build. Because we know the final build will be in the build directory and it will be in javascript, we can set the start script like so:
"scripts": {
  "build": "tsc",
  "start": "node src"
}
The start will not work if we try to run it from our root directory because our source code is in typescript. For that, we need to do a couple more setups.
npm install -D nodemon rimraf npm-run-all tsx
With those installed let's improve our build by adding a clean script and make the build script clean before the new build.
"scripts": {
  "clean": "rimraf ./build",
  "build": "npm run clean && tsc",
  "start": "node src",
}
With that, let’s add the scripts to run the project locally:
"scripts": {
  "clean": "rimraf ./build",
  "build": "npm run clean && tsc",
  "start": "node src",
  "local": "tsx src",
  "local:watch": "nodemon src -e ts,json --exec 'npm run local'",
}
The local script uses [tsx](https://www.npmjs.com/package/tsx) to run our project instead of node command since we are using TypeScript. I have decided to make the move from ts-node in general because the updates were slow, and I used to face a lot of issues with type module Node projects in general. I recommend it.
But local command only runs the server once and will not detect your changes. That’s why the local:watch is needed so we can run the server and watch for changes when you are working.
It uses nodemon to run the project in src directory watching for extensions ( -e) ts and json and whenever there are changes to execute ( --exec ) the npm run local script command.
When developing, simply run npm run local:watch .
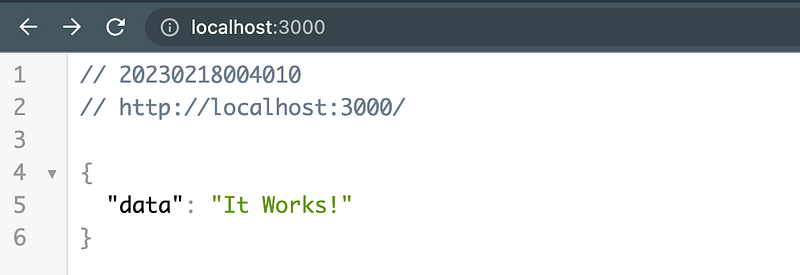
Note: I am using a JSON Viewer extension in Chrome
Test Setup
I do not recommend going without a test. There have been great things happening on the testing side of things with the release of a built-in test runner in Node, which will make things simpler.
However, I still use jest and the following setup is easy to swap to something else if you prefer.
Start with the following installs:
npm i -D supertest @types/supertest jest @types/jest ts-jest
We will be using supertest to test our server and the rest is just jest , its types ( @types/jest) and a jest typescript version ( ts-jest ) to run things.
Now you can add the jest.config.cjs file to the project root folder with the following code:
module.exports = {
  transform: {
    '^.+\\.ts?$': 'ts-jest',
  },
  testEnvironment: 'node',
  testRegex: './src/.*\\.(test|spec)?\\.(js|ts)$',
  moduleFileExtensions: ['ts', 'js', 'json'],
  roots: ['<rootDir>/src'],
};
The reason it is *.cjs is that we are using a type of module in this setup.
The setup is super simple; feel free to add more extensions as you need, but overall, that’s all you need to start with jest and typescript.
With that, we can add the test script:
"scripts": {
  "clean": "rimraf ./build",
  "build": "npm run clean && tsc",
  "start": "node src",
  "local": "tsx src",
  "local:watch": "nodemon src -e ts,json --exec 'npm run local'",
  "test": "jest"
}
Now let’s test our server by adding the index.test.ts file inside the src directory with the following code:
import supertest from "supertest";
import { server } from "./index";

describe("Server", function () {
  const request = supertest.agent(server);

  afterAll((done) => {
    server.close(done);
  });

  it("should get /", async () => {
    const res = await request.get("/");

    expect(res.status).toBe(200)
    expect(res.body).toEqual({"data": "It Works!"})
  });
});
This is simply checking if when we make a GET request to our basic server, we get what we set it to return.
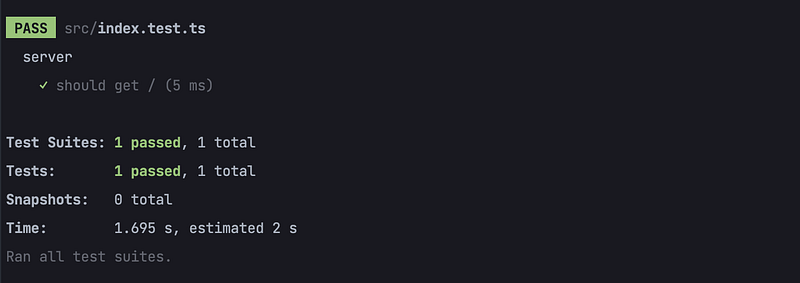
One thing we need to do now is to exclude test files ( *.test.ts) from our build by adding them to the exclude option in the ts-config.json file
{
  "compilerOptions": {
     "target": "ESNext",
     "module": "ESNext",
     "rootDir": "./",
     "resolveJsonModule": true, /* in case you are importing JSON files */
     "outDir": "./build",
     "esModuleInterop": true,
     "forceConsistentCasingInFileNames": true,
     "strict": true,
     "noImplicitAny": true,
     "skipLibCheck": true,
  },
  "include": [
     "src"
  ],
  "exclude": [
     "src/**/*.test.ts"
  ]
}
You can now deploy the build directory somewhere, like Netlify, AWS ElasticBeanStalk, Heroku, etc, and it should work fine.
ESLint and Prettier Setup
Linting and auto-formatting our code makes it consistent and easier to read. It also catches things we often don’t pay attention to by improving the quality of our code even more.
Start by installing a few things:
npm install -D @typescript-eslint/parser @typescript-eslint/eslint-plugin eslint prettier eslint-config-prettier
Now create the .eslintrc file with the following code:
{
  "extends": [
    "eslint:recommended", "plugin:@typescript-eslint/recommended", "prettier"
  ],
  "parser": "@typescript-eslint/parser",
  "plugins": [
    "@typescript-eslint"
  ],
  "root": true
}
We can now create the lint , format and format:check scripts like so:
"scripts": {
  "clean": "rimraf ./build",
  "build": "npm-run-all lint format clean && tsc",
  "start": "node src",
  "local": "tsx src",
  "local:watch": "nodemon src -e ts,json --exec 'npm run local'",
  "lint": "eslint src",
  "format": "npx prettier --write src",
  "format:check": "npx prettier --check src",
  "test": "jest"
}
Note that the build script was changed to run the lint script before the cleaning and build.
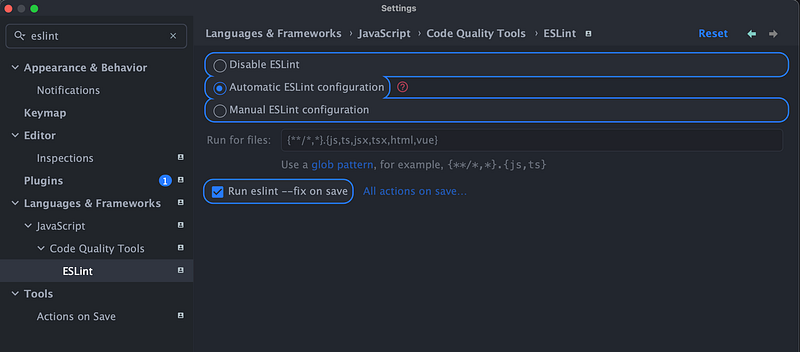
You should configure your IDE or code editor to use the eslint configuration to auto-check and format things when you make code saves to get the best of this setup. Otherwise, manually run these commands on your own.
This is how it looks for JetBrains IDEs like IntelliJ and WebStorm:
Final touches
We need the .gitignore file to make sure we don’t commit things we don’t have to. It should look like this
# IntelliJ project files
.idea
*.iml
out
gen

# VSCode
.vscode/*
!.vscode/settings.json
!.vscode/tasks.json
!.vscode/launch.json
!.vscode/extensions.json
!.vscode/*.code-snippets

# Local History for Visual Studio Code
.history/

# Built Visual Studio Code Extensions
*.vsix

# Folders
dist
build
node_modules
Take Away
This setup is all you need to start. Depending on your project you may need additional things.
Check all the code in the following template repo. Let me know if you have any questions or need further assistance with something else.
GitHub - beforesemicolon/node-typescript-project-template: A simple template for a node+typescript… *You can't perform that action at this time. You signed in with another tab or window. You signed out in another tab or…*github.com

YouTube Channel: Before Semicolon Website: beforesemicolon.com