
 By Elson Correia
Let’s continue our adventure through the linked list world by learning how to create a circular linked list along with how to reverse a linked list which is a must-know linked list algorithm.
Video Version of This Article
This post is an improved and more detailed article version of the Linked List Data Structure Series on Youtube that you can check if you prefer videos.
Read previous parts of this article
This article already assumes you read or is familiar with the previously linked list articles covering what it is and its single and double implementations.
Part 1 — Intro to Linked List Data Structure Part 2— Double and Sorted Linked List
Circular Linked List
A circular linked list is simply a list in which the tail and head elements point to each other. So what is so special about it?
A lot of lists out there have a circular nature to them. If I have a music playlist and want to continuously play the songs in a loop having to track the end and start of the list is annoying. With a circular list, I only need to worry about going forward and backward.
Another example includes multiplayer games like Monopoly which the player's play order is circular as well as the board. Linked lists have faster insertion and removal time complexity in general and having a list of a circular nature makes it a powerful list to work with.
Any list with a round-robin nature can benefit from a Circular Linked List whether for allocation, computing, or scheduling purposes.
Circular List Implementation
You should already be familiar with single and double-linked list implementations from the previous articles. For the circular linked list implementation the focus would be on the “push”, “insert” and “remove” methods.
If adding a new item to the end or beginning we need to make their point to each other. If removing items from the end or beginning we need to point their replacement to each other. Everything else you saw from those implementations remains the same.
The limitation of circular linked lists is that iterating the list non-stop may result in an infinite loop. To avoid this you must keep track and compare the current element to the head or tail element to know when to quit the looping.
Let’s start by setting up the basic class for it and regardless if it is a single or double-linked list, tracking the head and tail element is optimal for this.
Note: This particular circular list is a doubly and it is the same implementation of the Double linked list done in the previous article. Check that article for more detailed explanation.
class CircularLinkedList {
  #size = 0;
  head = null;
  tail = null;

  get size() {
    return this.#size;
  }
}
To show you how to handle looping a circular linked list, let's implement a “toString” method as an example. This method loops the list from the head element and contacts its value to the string which we initialize to contain the head value at first.
toString() {
  if(!this.size) return '';

  let str = `${this.head.value}`;
  let current = this.head.next;

  while(current && current !== this.head) {
    str += `, ${current.value}`;
    current = current.next;
  }

  return str;
}
What stops it from looping infinitely is the check if the current element is equal the to head element which means that the list came back around.
For the “push” method, what we care about is that after we do the insertion we need to make the head and tail point to each other.
push(item) {
  const element = this.createElement(item);

  if(this.head === null) {
    this.head = element;
    this.tail = element;
  } else {
    this.tail.next = element;
    element.prev = this.tail;
    this.tail = element;
  }

  this.tail.next = this.head;
  this.head.prev = this.tail;
  this.#size += 1;

  return this.size;
}
When it comes to the “insert” method, a similar thing needs to happen.
insert(item, index = 0) {
  if (index < 0 || index > this.size) return;

  const element = this.createElement(item);

  // insert at the start
  if (index === 0) {
    element.next = this.head;

    if(this.head) {
      this.head.prev = element;
    } else {
      this.tail = element;
    }

    this.head = element;

  } else if(index === this.size) { // insert at the end
    this.tail.next = element;
    element.prev = this.tail;
    this.tail = element;
  } else { // insert anywhere in the middle
    let previous = this.head;

    for(let i = 0; i < index - 1; i++) {
      previous = previous.next;
    }

    element.next = previous.next;
    previous.next.prev = element;
    previous.next = element;
    element.prev = previous;
  }

  this.tail.next = this.head;
  this.head.prev = this.tail;
  this.#size += 1;

  return this.size;
}
This method has 2 insertion points for the head and tail. We could add out logic there but to avoid repeating ourselves we add it at the end after all insertion is done.
For the “remove” method, the same logic applies.
remove(index = 0) {
  if (index < 0 || index >= this.size) return null;

  let removedElement = this.head;

  if (index === 0) { // remove at the start
    this.head.next.prev = null;
    this.head = this.head.next;
  } else if(index === this.size - 1) { // remove at the end
    this.tail.prev.next = null;
    this.tail = this.tail.prev;
  } else { // remove anywhere in the middle
    let previous = this.head;
    for(let i = 0; i < index - 1; i++) {
      previous = previous.next;
    }
    removedElement = previous.next;
    previous.next = removedElement.next;
    removedElement.next.prev = previous;
  }

  if(this.head && this.tail) {
    this.tail.next = this.head;
    this.head.prev = this.tail;
  } else {
    this.head = null;
    this.tail = null;
  }

  this.#size -= 1;
  return removedElement.value;
}
Source Code: Check this full code on Github
Reversed Linked List
The reverse linked list algorithm is a common algorithm problem asked at job interviews and perhaps one of the related linked list algorithms that require some careful thought. What needs to happen is to make the last element on the list the head element and revert the pointer of all elements.
For a singly linked list, the reverse method looks like this:
reverse() {
  // make the head element
  // point to null since
  // it will become the last
  let previous = this.head;
  let current = this.head.next;
  previous.next = null;

  while(current) {
    const next = current.next;
    current.next = previous;
    previous = current;
    current = next;
  }

  this.head = previous;
}
The first thing we do is mark the “head” as previous since we will start from the second element on the list. So “current” means the element we are currently iterating. Then we make the “previous” (current head) point to “null” since it will end up at the end.
We only start looping if there is a “current” element. If the list only contains 1 element it will never loop and the list remains the same since we assign “previous” back to “head”.
We first grab the next element to iterate from the “current” element and keep it. Next, we reverse the “current” element to point to “previous” so “previous” becomes the element after. Then “current” becomes previous before we jump to the next element and we make “current” the next element we grabbed.
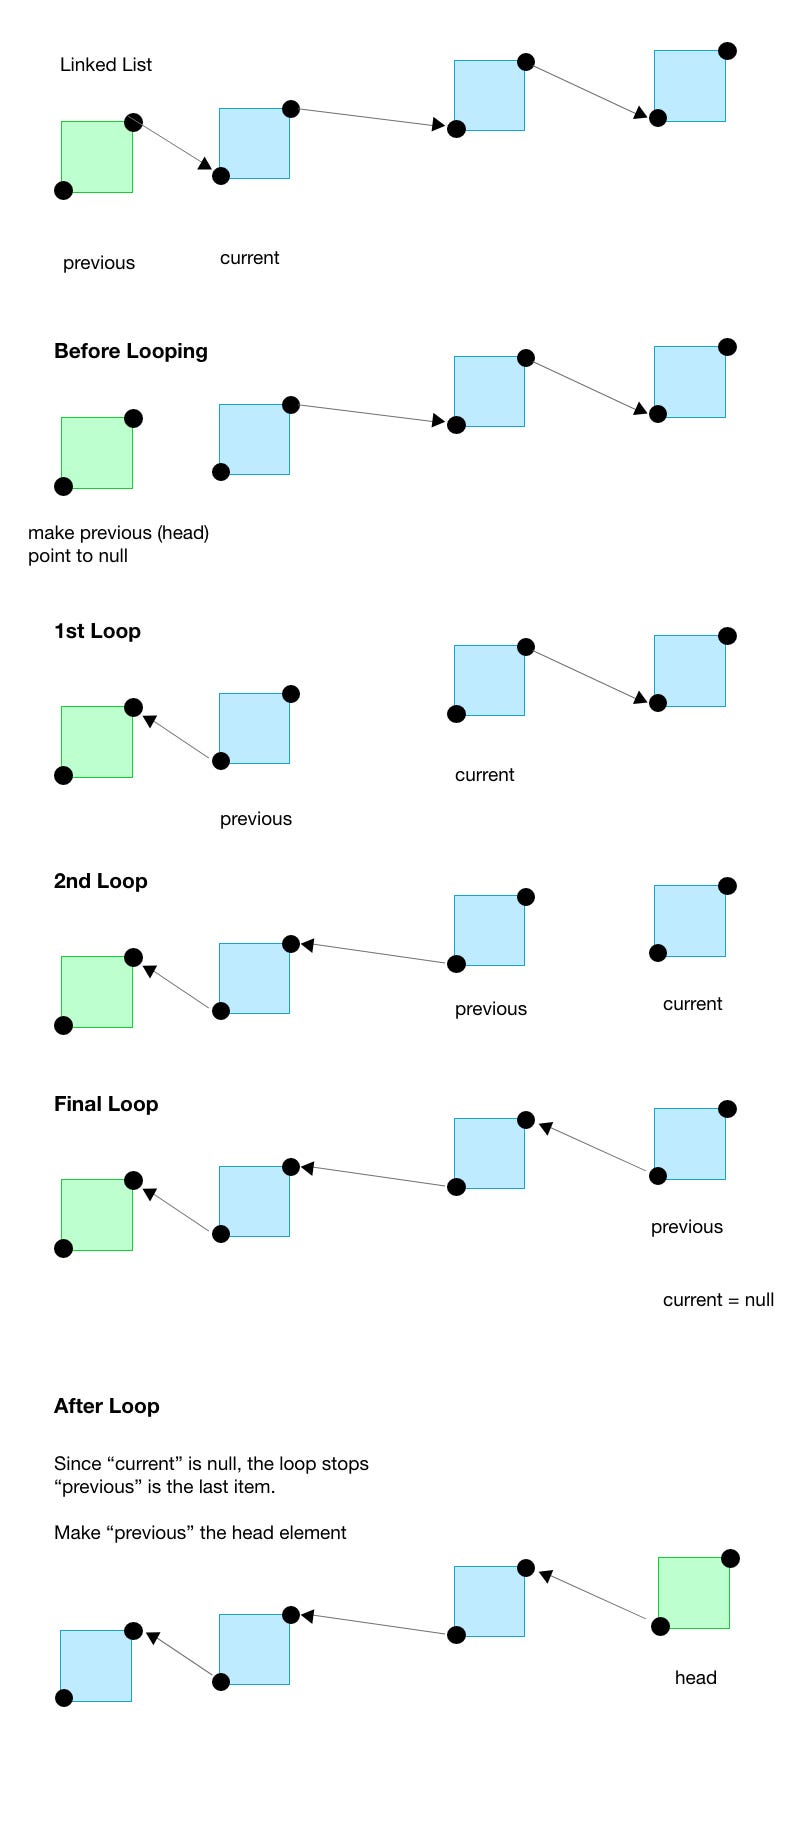
Source Code: Check this full code on Github
In case we have a doubly-linked list, the only difference would be to handle the previous pointer as well. The algorithm would remain mostly the same but just to show you that you can approach it in many different ways, the following is an even simpler way to reverse a linked list.
reverse() {
  let current = this.head;
  this.head = this.tail;
  this.tail = current;
  while(current) {
    const prev = current.prev;
    const next = current.next;
    current.prev = next;
    current.next = prev;
    current = next;
  }
}
This time we start from the head (current) and right up front, we reverse the head and tail. This is a simple swap algorithm.
We still loop while there is a “current” and upfront we grab its “previous” and “next” element and again, swap them. Then, the “current” becomes “next” and the loop continues.
Source Code: Check out the full code on Github.
Conclusion
Linked lists are fun to implement in Javascript and developers should consider it in many applications they often pick an array instead. As a developer, working with data is inevitable and most of the time you are doing more writing operations than reading on a list. Whenever that's the case, consider a linked list.
As a general rule of thumb, know your tools and pick them according to the job. That's what makes a developer stand out. Master your data structure and practice your algorithm.

YouTube Channel: Before SemicolonWebsite: beforesemicolon.com